IFJ Tools
Helpful tools for FNTD pictures.
This project is maintained by kilianna
IFJ toolkit - Help
Installation and introductory information
To search for radiation traces using the microscope image processing toolkit, download the IfjTools.jar file and place it in the Plugins directory (a subdirectory of the ImageJ or Figi.app directory). After restarting the program, it will be visible in the drop-down menu in ImageJ: Plugins -> IFJ Tools.
The IFJ Tools package includes the following:
- Slices Correction - for burn and depth corrections to the image stack
- Slice Multiply - for additional corrections to the image stack
- Reset Color Balance - to shift the display range so that 0 corresponds to black
- Stack to CSV - to convert a stack of images into a set of CSV files
- Points Generator - for generating points with user-defined parameters in random places in the image
The annotations regarding the operations performed on the file are placed by the plugin. They can be viewed by going to Image -> Show Info….
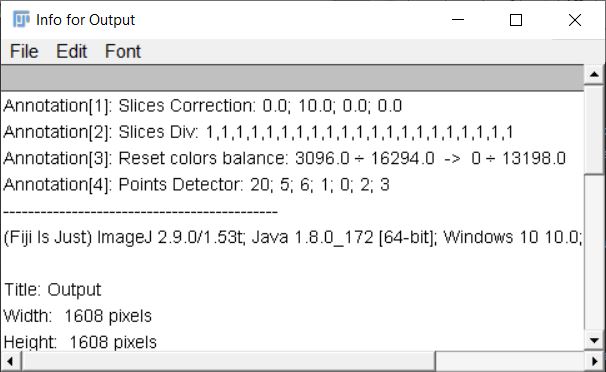
Reset color balance
For the selected image (or stack), the display range is adjusted so that a pixel value of 0 corresponds to the color black. After execution, a window with information about the adjustment is displayed.
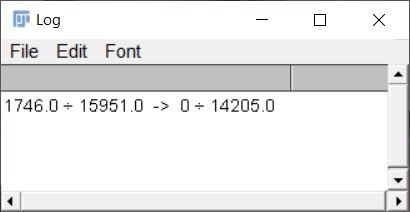
In the example given above, the display range was originally set from 1746.0 (the darkest pixel, black) to 15951.0 (the brightest pixel, white). It has now been adjusted to range 0 - 14205.0. Each pixel’s value in the image stack has been decreased by 1746.0. As a result, black pixels now have a value of 0, and white pixels have a value of 14205.0.
Slices Correction
The plugin includes a feature for adjusting burning and depth.
The burn-in correction factor for a specific image in the stack is determined using an empirically derived formula:
\[time\\\_corr = 0.765*e^{(\frac{-t}{443.85})}+0.235\] \[t = t_{0}+ (n-1)*step\]where:
$t_{0}$ - starting time [s];
$n$ - image number;
$step$ - reading time of a single image [s].
The individual pixel values in the image are then divided by the correction factor calculated according to the formula above.
A similar approach is followed for making depth corrections, with the use of an empirically determined formula:
\[depth\\\_corr = e^{-0.015 * d}\] \[d = d_{0}+ (n-1)*step\]where:
$d_{0}$ - starting depth [μm];
$n$ - image number;
$step$ - the step by which the depth at which the reading is taken is increased [μm].
As before, the values of individual pixels in the image are divided by the depth correction factor determined for that image.
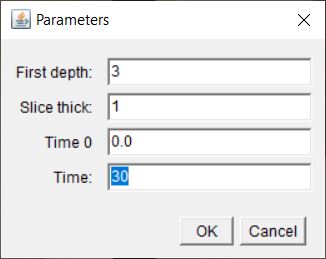
The following should be provided as input values:
First depth - the depth at which the reading is taken (0 indicates the surface) [μm];
Slice thick - the step by which the depth increases [μm];
Time 0 - starting time (if a given crystal has already been read) [s];
Time - reading time of each image [s].
The program will apply both corrections to the original image simultaneously.
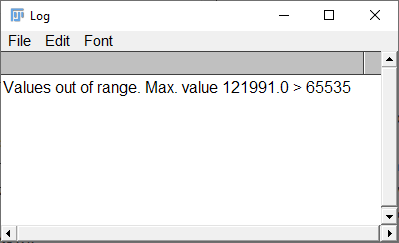
If the pixel values exceed the range provided for a 16-bit image after the conversions are applied, a message will be displayed. Pixels with values that exceed the maximum value will be set to a default value (denoted as 65535), regardless of their actual calculated value. In this situation, the relationships between individual pixel values are not preserved.
Slice Multiply

This plugin allows you to multiply the pixel values in individual images by the values provided by the user. In the text field, enter the appropriate multipliers for each image, separating them with a comma. If you want a specific image in the stack to remain unchanged, enter the value 1 as the corresponding multiplier. It’s important to ensure that the number of values provided matches the number of images in the stack. If there is a mismatch, the program will display information about the inconsistency, providing the number of coefficients entered by the user and the number of expected coefficients.

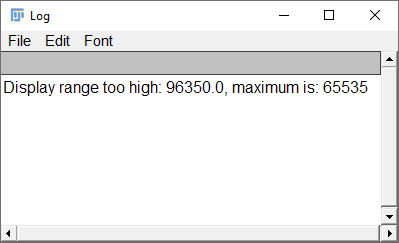
If the pixel values resulting from the applied conversions exceed the range specified for a 16-bit image (i.e. 65535), an appropriate message will be displayed. Pixels with values that exceed the maximum value after conversion will be set to 65535 by default, regardless of their actual calculated value. In this scenario, the value relationships between individual pixels are not maintained.
Stack to CSV
A module is available for converting and exporting a stack of images to a file. When the module is run, a window will open, in which the user must select the name and target location of the exported files. After the user accepts the selection, files in CSV format will be created at the specified location. Each file will be named using the name provided by the user and the image number in the stack (e.g. name_3.CSV corresponds to the third image in the stack).
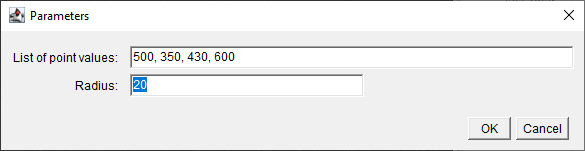
Points Generator
Use this module to generate points with specific parameters at random locations in the image. In the dialog box, enter a list of values (separated by commas) and the point size (radius) in pixels. The plugin will create circles with the specified radius on the active window’s image. The pixel values within these circles will be increased by the values provided in the list (List of points values).